
Getting Started#
Installation#
When it comes to using Shamrock several options are available.
![]()
I will assume that you want to compile it from source (as most probably do anyway) in the following and specify what changes if you are installing it directly through other means. See the list for the alternatives:
Spack package (Easy but long compile time)
Homebrew package (Homebrew package, precompiled as well)
Docker container (Fastest but not the most convenient)
If you only want to use it and never modify it go to any one the links above for the packaged versions.
Prerequisite#
If you don’t already have LLVM (…) :
wget --progress=bar:force https://apt.llvm.org/llvm.sh
chmod +x llvm.sh
sudo ./llvm.sh 20
sudo apt install -y libclang-20-dev clang-tools-20 libomp-20-dev
For the other requirements do :
sudo apt install cmake libboost-all-dev python3-ipython ninja-build
Just to ensure that you have the correct stuff do:
clang-20 --version
If you get an error that’s weird and it is probably simpler to drop a message on Discord for help.
With Homebrew:
brew install cmake libomp boost open-mpi adaptivecpp python ninja fmt
sudo pacman -Syu base-devel git python python-pip cmake boost ninja openmp openmpi doxygen llvm20 clang20 lld
Nothing to do at this stage
Doing the setup#
Cloning the repo#
Now, before cloning the source code there are two options:
Do you want to contribute stuff to Shamrock (e.g. modify it and propose the changes)
Do you want to just use the standard version
Go in the folder where you want to work and do:
git clone --recurse-submodules https://github.com/Shamrock-code/Shamrock.git
This can be a bit more involved if you are not used to Github, but this is how to get work done there:
If you already have registered your SSH key on Github you don’t need to touch it, otherwise:
First go to Github.com and ensure that you are logged in.
In a terminal on your laptop/desktop do
ssh-keygen -t rsa -b 4096(I recommend rsa4096 since some supercomputers require it). You can leave the password empty if you want to avoid the need to type it. And you can also accept the default name of the keyid_rsa.Now recover your public key
cat ~/.ssh/id_rsa.pub(You may have to change the filename, this one is the default)Go to Github SSH user key and click on
New SSH Key, choose a name and paste the key obtained bycat ~/.ssh/id_rsa.pubin the text box namedKey.
Alright now that the SSH key is good:
First go to Github.com and ensure that you are logged in.
Go to the Shamrock repo and at the top right of the screen you should see a button called “Fork”. Alternatively you can just go to that URL.
And click on Create fork
You should land on a page whose url is
https://github.com/<your github username>/Shamrock
Now assuming you have registered your SSH key do:
git clone --recurse-submodules git@github.com:<your github username>/Shamrock.git
And go to the new folder
cd Shamrock
Creating the environment#
Shamrock provides its own utilities with pre-made configurations for various machines. Here I give recommendations for a quickstart guide. If you want more details about the environment setup see This page.
./env/new-env --machine debian-generic.acpp --builddir build -- --backend omp
./env/new-env --machine macos-generic.acpp --builddir build --
./env/new-env --machine archlinux.acpp --builddir build -- --backend omp
./env/new-env --machine conda.acpp --builddir build -- --backend omp
Compiling#
# Now move in the build directory
cd build
# Activate the workspace, which will define some utility functions
source ./activate # load the correct modules and ENV vars
shamconfigure     # alias to the correct cmake command
shammake          # alias to ninja build (or make if ninja is unavailable)
If you see any errors at this point it can be hard to list all cases so again drop a message on Discord for help.
Starting Shamrock#
Warning
This guide assumes that you have Shamrock compiled from source. I will mention what has to be changed if it is installed globally in notes in the following sections.
You have 4 main ways of using Shamrock:
As a Python interpreter
As a Python interpreter + Ipython
As a Python package
In a Jupyter notebook
For all of them except the Python interpreter mode you should run the following beforehand:
# Configure install paths in the local build folder
cmake . -DCMAKE_INSTALL_PYTHONDIR=$(pwd)/pysham -DCMAKE_INSTALL_PREFIX=$(pwd)/shaminstall
# Install it !
shammake install
Python interpreter mode#
So assuming that you have Shamrock compiled and all, we can start to do stuff with it. Let’s start simple just to check that the executable loads correctly:
./shamrock
Note
If you have installed shamrock globally using any of the alternatives, just replace ./shamrock by shamrock in this section
You should see something like (even if the git infos & time might differ):
Warning: No kernel can be run without a sycl configuration (--sycl-cfg x:x)                                   [Init][rank=0]

  █████████  █████   █████   █████████   ██████   ██████ ███████████      ███████      █████████  █████   ████
 ███░░░░░███░░███   ░░███   ███░░░░░███ ░░██████ ██████ ░░███░░░░░███   ███░░░░░███   ███░░░░░███░░███   ███░
░███    ░░░  ░███    ░███  ░███    ░███  ░███░█████░███  ░███    ░███  ███     ░░███ ███     ░░░  ░███  ███
░░█████████  ░███████████  ░███████████  ░███░░███ ░███  ░██████████  ░███      ░███░███          ░███████
 ░░░░░░░░███ ░███░░░░░███  ░███░░░░░███  ░███ ░░░  ░███  ░███░░░░░███ ░███      ░███░███          ░███░░███
 ███    ░███ ░███    ░███  ░███    ░███  ░███      ░███  ░███    ░███ ░░███     ███ ░░███     ███ ░███ ░░███
░░█████████  █████   █████ █████   █████ █████     █████ █████   █████ ░░░███████░   ░░█████████  █████ ░░████
 ░░░░░░░░░  ░░░░░   ░░░░░ ░░░░░   ░░░░░ ░░░░░     ░░░░░ ░░░░░   ░░░░░    ░░░░░░░      ░░░░░░░░░  ░░░░░   ░░░░

Copyright (c) 2021-2026 Timothée David--Cléris (tim.shamrock@proton.me)
SPDX-License-Identifier : CeCILL Free Software License Agreement v2.1
Start time : 2026-04-16 22:27:18
-----------------------------------------------------

Shamrock version : 2025.10.0+git.8a0c0b85e.patch-2026-04-15-15-33.dirty

Git infos :
     commit : 8a0c0b85e3598ba83d124ffe8277bddf9ddc9430
     HEAD   : refs/heads/patch-2026-04-15-15-33, refs/remotes/origin/patch-2026-04-15-15-33
     modified files (since last commit):
        doc/sphinx/source/user_guide/quickstart.md

-----------------------------------------------------
-----------------------------------------------------
log status :
 - Loglevel: 0, enabled log types :
xxx: xxx ( logger::normal )
Warning: xxx ( logger::warn )                                                                                  [xxx][rank=0]
Error: xxx ( logger::err )                                                                                     [xxx][rank=0]
Warning: No sycl configuration (--sycl-cfg x:x) has been set, early exit                                      [Init][rank=0]
-----------------------------------------------------
 - MPI finalize
Exiting ...

 Hopefully it was quick :')
If it works, great! Next let’s see what devices are available to perform the compute:
./shamrock --smi
You should see the same thing as before but with something like this added to it:
 ----- Shamrock SMI -----

Available devices :

1 x Shamrock process: ---------------------------------------------------------------------
| id |      Device name          |      Platform name     |  Type  |    Memsize   | units |
-------------------------------------------------------------------------------------------
|  0 |   NVIDIA GeForce RTX 3070 |      CUDA (platform 0) |    GPU |      7.63 GB |    46 |
|  1 |         Intel(R) Graphics |    OpenCL (platform 0) |    GPU |     58.00 GB |    64 |
|  2 |  AdaptiveCpp OpenMP h ... |    OpenMP (platform 0) |    CPU |     62.17 GB |    24 |
-------------------------------------------------------------------------------------------
If you are familiar with GPUs you should recognize the similarity with commands such as nvidia-smi, rocm-smi or xpu-smi.
In this guide as you may have noticed above we are compiling using AdaptiveCpp with OpenMP backend so we can only run on CPU (device 2 in my case), for most people OpenMP tends to be device 0, so that’s what I will use in the rest of the guide. Do not forget to change it if that is not the case on your system like mine.
Now let’s see if Shamrock can start on the selected device. To do so run
./shamrock --smi --sycl-cfg 0:0
It should add something like this
Selected devices : (totals can be wrong if using multiple ranks per device)
  - 1 x AdaptiveCpp OpenMP host device (id=0)
          - default_work_group_size = 1
          - global_mem_size = 62.17 GB
          - local_mem_size = No limit !
          - mem_base_addr_align = 8,
          - max_mem_alloc_size_dev = 16.00 EB,
          - max_mem_alloc_size_host = 62.17 GB,
          - pci_address = Unknown
      - Warnings:
          - mem_base_addr_align for is 8 bits. I will assume that this is an issue and default to 64 bits (8 bytes) instead.
  Total memory : 62.17 GB
  Total compute units : 24

-----------------------------------------------------
 - Code init: DONE.
Especially if you see - Code init: DONE. it means that Shamrock can execute compute kernels (which is arguably a pretty useful thing XD). For the uninitiated a compute kernel is essentially a parallel section like a parallel for loop that was scheduled onto the device to perform computations. And in the GPU or modern CPU world a HPC code is roughly just a large succession of compute kernels.
Also if you want to see the performance of the hardware you are running add the --benchmark-mpi flag.
./shamrock --smi --sycl-cfg 0:0 --benchmark-mpi
For example on my desktop (at home very late at night when I’m writing this 😅) I get:
-----------------------------------------------------
Running micro benchmarks:
 - p2p bandwidth    : 15.2 GB.s^-1 (ranks : 0 -> 0) (loops : 1825)
 - saxpy (f32)   : 92 GB.s^-1 (min = 9.2e+10, max = 9.2e+10, avg = 9.2e+10) (2.2e+00 ms, 128.00 MB)
 - saxpy (f64)   : 83.8 GB.s^-1 (min = 8.4e+10, max = 8.4e+10, avg = 8.4e+10) (2.4e+00 ms, 128.00 MB)
 - saxpy (f32_2)   : 89.3 GB.s^-1 (min = 8.9e+10, max = 8.9e+10, avg = 8.9e+10) (2.3e+00 ms, 128.00 MB)
 - saxpy (f64_2)   : 75.2 GB.s^-1 (min = 7.5e+10, max = 7.5e+10, avg = 7.5e+10) (2.7e+00 ms, 128.00 MB)
 - saxpy (f32_3)   : 98.1 GB.s^-1 (min = 9.8e+10, max = 9.8e+10, avg = 9.8e+10) (2.1e+00 ms, 128.00 MB)
 - saxpy (f64_3)   : 95.7 GB.s^-1 (min = 9.6e+10, max = 9.6e+10, avg = 9.6e+10) (2.1e+00 ms, 128.00 MB)
 - saxpy (f32_4)   : 85.9 GB.s^-1 (min = 8.6e+10, max = 8.6e+10, avg = 8.6e+10) (1.2e+00 ms, 64.00 MB)
 - saxpy (f64_4)   : 74.4 GB.s^-1 (min = 7.4e+10, max = 7.4e+10, avg = 7.4e+10) (2.7e+00 ms, 128.00 MB)
 - fma_chains (f32) : 40.6 Gflops (min = 4.1e+10, max = 4.1e+10, avg = 4.1e+10) (2.1e+02 ms, rotations = 64)
 - fma_chains (f64) : 38.1 Gflops (min = 3.8e+10, max = 3.8e+10, avg = 3.8e+10) (4.5e+02 ms, rotations = 128)
 - fma_chains (f32_2) : 81.8 Gflops (min = 8.2e+10, max = 8.2e+10, avg = 8.2e+10) (2.1e+02 ms, rotations = 64)
 - fma_chains (f64_2) : 65 Gflops (min = 6.5e+10, max = 6.5e+10, avg = 6.5e+10) (2.6e+02 ms, rotations = 64)
 - fma_chains (f32_3) : 108 Gflops (min = 1.1e+11, max = 1.1e+11, avg = 1.1e+11) (2.4e+02 ms, rotations = 64)
 - fma_chains (f64_3) : 100 Gflops (min = 1.0e+11, max = 1.0e+11, avg = 1.0e+11) (5.1e+02 ms, rotations = 128)
 - fma_chains (f32_4) : 160 Gflops (min = 1.6e+11, max = 1.6e+11, avg = 1.6e+11) (2.2e+02 ms, rotations = 64)
 - fma_chains (f64_4) : 119 Gflops (min = 1.2e+11, max = 1.2e+11, avg = 1.2e+11) (2.9e+02 ms, rotations = 64)
 - vector_allgather (u64, n=   1) : 3.467e-06 s (min = 3.47e-06, max = 3.47e-06, loops = 28841)
 - vector_allgather (u64, n=   8) : 3.431e-06 s (min = 3.43e-06, max = 3.43e-06, loops = 29146)
 - vector_allgather (u64, n=  64) : 3.451e-06 s (min = 3.45e-06, max = 3.45e-06, loops = 28978)
 - vector_allgather (u64, n= 128) : 3.384e-06 s (min = 3.38e-06, max = 3.38e-06, loops = 29554)
 - vector_allgather (u64, n= 150) : 3.363e-06 s (min = 3.36e-06, max = 3.36e-06, loops = 29733)
 - vector_allgather (u64, n=1024) : 3.392e-06 s (min = 3.39e-06, max = 3.39e-06, loops = 29484)
-----------------------------------------------------
Alright! Let’s run something “useful” (we will run actual simulation in the next part of the tutorial), it will be one of the algorithm benchmarks.
./shamrock --smi --sycl-cfg 0:0 --rscript ../examples/benchmarks/run_exclusive_scan_in_place.py
You should see a figure like:
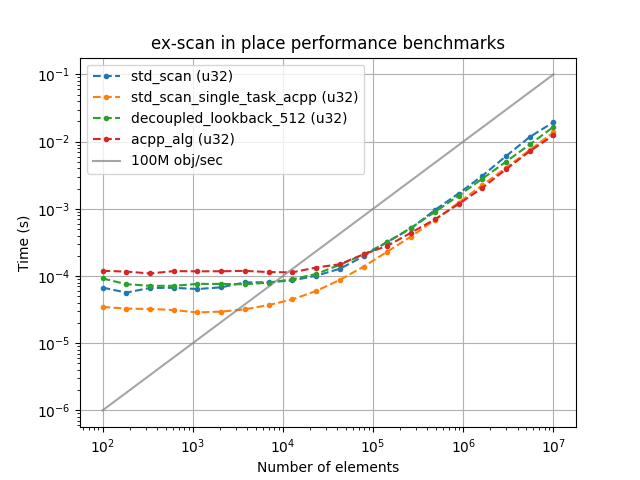
Note
The --rscript flag means run-scripts. In Shamrock since everything goes through Python your run will be a Python script, hence the name “run script”. Here it is a benchmark of one of Shamrock’s algorithms.
Note
It is normal for the figures to vary slightly between runs. This is a benchmark of the exclusive scans implemented in Shamrock, which are quite fast and therefore subject to some run-to-run variability. On CPU, this is especially noticeable depending on what else is using the memory bandwidth.
Python interpreter + Ipython#
Warning
IPython does not come by default with python. Ensure that it is installed on your system, or you can install it in a Python venv but then things are a bit different, see Using Shamrock with Python venv.
sudo apt install python3-ipython
brew install ipython
sudo pacman -Syu ipython
TODO: we should add it to the conda env probably by default to avoid the need for the user to tweak it.
Alright! We can do interactive stuff now by using the --ipython flag in place of the --rscript flag. Just know that this is limited to use with a single process. If you want to use Shamrock with MPI to distribute across multiple machines forget about interactive modes 😅.
./shamrock --smi --sycl-cfg 0:0 --ipython
Which should display something like:
--------------------------------------------
-------------- ipython ---------------------
--------------------------------------------
SHAMROCK Ipython terminal
Python 3.14.3 (main, Feb 13 2026, 15:31:44) [GCC 15.2.1 20260209]

###
import shamrock
###

In [1]:
Note
Currently on MacOS and maybe some other OS you will see UserWarning: Attempting to work in a virtualenv. If you encounter problems, please install IPython inside the virtualenv. do not worry to much about it, it works just fine without a venv. We will create one at the next step anyway.
Now you can use the same python as one would in runscripts. A classic one to run there is the following (which is what I do in the basic CI test btw):
1import shamrock
2print("Shamrock version:", shamrock.version_string())
3print("Git info:", shamrock.get_git_info())
4shamrock.change_loglevel(1)
5if not shamrock.sys.is_initialized():
6    shamrock.sys.init('0:0')
7
8# To test that importing nested modules works
9from shamrock.math import *
You should get something like (do not forget to change the device selection in shamrock.sys.init('0:0') if you are not using device 0):
--------------------------------------------
-------------- ipython ---------------------
--------------------------------------------
SHAMROCK Ipython terminal
Python 3.14.3 (main, Feb 13 2026, 15:31:44) [GCC 15.2.1 20260209]

###
import shamrock
###

In [1]: import shamrock
   ...: print("Shamrock version:", shamrock.version_string())
   ...: print("Git info:", shamrock.get_git_info())
   ...: shamrock.change_loglevel(1)
   ...: if not shamrock.sys.is_initialized():
   ...:     shamrock.sys.init('0:0')
   ...:
   ...: # To test that importing nested modules works
   ...: from shamrock.math import *
Shamrock version: 2025.10.0+git.bb2b3814a.patch-2026-04-15-15-33.dirty
Git info:      commit : bb2b3814af0ec0c2f16f46017185dbdba36d21fa
     HEAD   : refs/heads/patch-2026-04-15-15-33, refs/remotes/origin/patch-2026-04-15-15-33
     modified files (since last commit):
        doc/sphinx/source/user_guide/quickstart.md

-> modified loglevel to 0 enabled log types :
log status :
 - Loglevel: 1, enabled log types :
Info: xxx ( logger::info )                                                                [xxx][rank=0]
xxx: xxx ( logger::normal )
Warning: xxx ( logger::warn )                                                             [xxx][rank=0]
Error: xxx ( logger::err )                                                                [xxx][rank=0]

In [2]:
If you want to run the same script as above just do (in the IPython prompt):
run ../examples/benchmarks/run_exclusive_scan_in_place.py
Python package#
This one is simple. First ensure that you have done:
# Configure install paths in the local build folder
cmake . -DCMAKE_INSTALL_PYTHONDIR=$(pwd)/pysham -DCMAKE_INSTALL_PREFIX=$(pwd)/shaminstall
# Install it !
shammake install
Now you just need to help python locate Shamrock python bindings which are in ./pysham. To do that, just prepend the python call by extending the python path like so
PYTHONPATH=./pysham:$PYTHONPATH python3 # can be just python on some systems
Then use the same thing as above to test it:
❯ PYTHONPATH=./pysham:$PYTHONPATH python3
Python 3.14.3 (main, Feb 13 2026, 15:31:44) [GCC 15.2.1 20260209] on linux
Type "help", "copyright", "credits" or "license" for more information.
>>> import shamrock
... print("Shamrock version:", shamrock.version_string())
... print("Git info:", shamrock.get_git_info())
... shamrock.change_loglevel(1)
... if not shamrock.sys.is_initialized():
...     shamrock.sys.init('0:0')
...
... # To test that importing nested modules works
... from shamrock.math import *
...
Shamrock version: 2025.10.0+git.bb2b3814a.patch-2026-04-15-15-33.dirty
Git info:      commit : bb2b3814af0ec0c2f16f46017185dbdba36d21fa
     HEAD   : refs/heads/patch-2026-04-15-15-33, refs/remotes/origin/patch-2026-04-15-15-33
     modified files (since last commit):
        doc/sphinx/source/user_guide/quickstart.md

-> modified loglevel to 0 enabled log types :
log status :
 - Loglevel: 1, enabled log types :
[xxx] Info: xxx ( logger::info )
[xxx] : xxx ( logger::normal )
[xxx] Warning: xxx ( logger::warn )
[xxx] Error: xxx ( logger::err )
>>>
As you can see, we have just imported and initialized Shamrock as a python package. Again to run the same script (for the third time already) you can do:
PYTHONPATH=./pysham:$PYTHONPATH python3 ../examples/benchmarks/run_exclusive_scan_in_place.py
Jupyter notebook#
Just for your pleasure and enjoyment through this flight… tutorial behold the magic command:
(
    python3 -m venv .pyvenv
    source .pyvenv/bin/activate
    pip install -U notebook
    export PYTHONPATH=./pysham:$PYTHONPATH
    jupyter notebook
)
It leverages the export PYTHONPATH to register the shamrock modules in the python venv even though Shamrock was never installed in it. Anyway thanks to that the ipython kernel launched inside jupyter should find Shamrock gracefully. Also note the parentheses around it. This ensures that the modifications made to the environment variables of your current terminal are contained only to the scope of this sequence of commands and everything goes back to normal after.
Note
If you are using the Shamrock Docker container there is a special case here. Instead of running jupyter, do the following
docker run -i -t -v $(pwd):/work -p 8888:8888 --platform=linux/amd64 ghcr.io/shamrock-code/shamrock:latest-oneapi jupyter notebook --allow-root --no-browser --ip=0.0.0.0 --NotebookApp.token=''
This will start jupyter in the current folder, you can then go to http://127.0.0.1:8888/ to use it.
Explanation of the flags:
-istart the docker container in interactive mode.-tstart a terminal.-v $(pwd):/workmount the current working directory to/workin the docker container.-p 8888:8888forward the 8888 port from inside the container.--platform=linux/amd64If you are on macos this will start a virtual machine.ghcr.io/shamrock-code/shamrock:latest-oneapithe docker container.jupyter notebookCome on you know what this does, do you ???--allow-rootInside the docker container you are root so you should bypass this check.--no-browserDo not open the browser there are none in the container obviously.--ip=0.0.0.0Otherwise the port is not forwarded correctly out of the container.--NotebookApp.token=''Do not use a token to log.
Next steps#
Alright now that you know how to compile & start Shamrock we can go many paths: